Climbing the North Ridge of Mount Baker is a unique summertime alpine objective: with the exception of a few ice couloirs in Sierras, it's pretty hard to find true blue ice climbing smack dab in the middle of the dog days of summer—but the North Ridge offers just that. Depending on how you handle the pitching out of your climbing, the time of year, and the particular route conditions, there are typically 3-4 pitches of enjoyable ice in the W12-WI3 range (and head further to climbers' right if you want to bump it into WI4), and a seemingly endless series of low-angle calf burner pitches to boot.
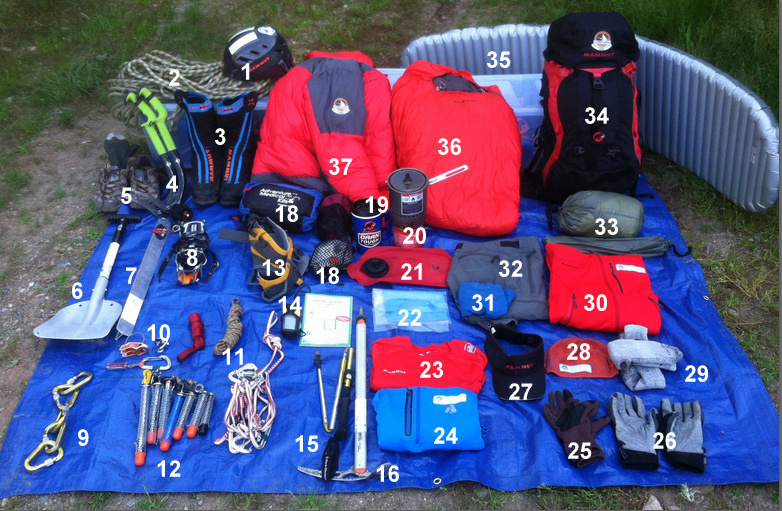
Given its popularity, and its novel nature as a summertime ice climbing in a glacial arena, I've fielded many questions about how to best pack for the adventure. So, while prepping for a recent ascent of the North Ridge, I took a moment to lay out the components of my pack, as seen in the photo below. I'll detail a bit about the “what” and “why” of each item, but before jumping into that, it's useful and necessary to put out a few important pieces of information and advice:
This particular North Ridge ascent was a 2-person climb in mid-July. The freezing level was predicted to be at 12,000' and there was a stable and reliable forecast predicting blue skies for several days to come. This allowed us some margin for trimming the fat off of our packs. Doing so would not be a good idea in “iffier” weather conditions.
Everyone has a different risk tolerance, cold tolerance, and approach to climbing. Therefore, the information here is only my particular choices. The beauty of “the freedom of the hills” is that you have the opportunity—and responsibility—to make your own choices and to experience the rewards or the consequences.
Provided all those conditionals make sense to you, let's take a look at what went into my pack, starting in the upper left and moving counter-clockwise by general gear category.
Helmet (Mammut Alpine Rider). Though Jim Nelson's Cascade Classics volume shows a smiling climber high-and-helmetless on the North Ridge, times have changed and we've evolved: I'd suggest one! Lighter is better; this one has a light-weight EPS core.
Rope (60m, Mammut Revelation, 9.2mm Lemon Duodess). A team looking to solo the more moderate terrain, could certainly get by with a shorter rope, but otherwise a 60m is very useful for the many exposed pitches of lower-angle ice on the upper mountain. Balancing 60m of length with 9.2mm of diameter keeps the pack light and a solid dry treatment (this one has SuperDry treatment) keeps the pack light even after climbing in wet snow conditions.
Boots (Mammut Nordwand TL). The Nordwands are perhaps a little bit of insulation overkill given the forecast, but they were the only boot I had with me out west and since they do perform exceptionally well in the vertical, they were excellent.
A) Ice tools (Black Diamond, Fuel). This tool choice is definitely overkill for the objective, but I was trying to find some ice to test them in for Climbing Magazine. The Petzl Sumtec would be an outstanding option otherwise. A tool combo with one adze and one hammer is useful for chopping away rotten surface ice or creating ledges (adze), digging t-slot picket anchors (adze), pounding in peg pickets (hammer), and mid-clip anchors (hammer/adze).
B) Tether (Black Diamond Spinner). Dropping your tools on the North Ridge would be expensive and problematic. A tether is the perfect middle way, allowing ease of movement and tool security—better than leashes and much better than no leashes!
Trail shoes. By early July substantial portions of the trail are free of snow, such that you've got about 2000' feet of gain without now. Trail shoes take it easy on your feet and make for a nice treat at camp.
Shovel. You can get by without a shovel by camping at the gravel sites that are typically exposed on Hogsback by early July, but I find camping on snow to be cleaner and overall more comfortable. Plus, this allows you to camp about 500' higher, speeding your summit morning traverse of the Coleman Glacier (provided you're doing the high entry, not the lower Mirkwood option).
Picket (MSR, 2'). This assumes the other climber is carrying one. Two pickets are useful for some of the traverses possibly necessary low on the route as you gain the ridge and toward the top—not to mention, as crevasse rescue anchors. 3' pickets are too cumbersome and a properly placed (in other words, don't just always default to a “peg” placement) 2' picket works well.
Crampons (Black Diamond, Cyborg). More overkill in terms of the tool/boot/crampon combo, but it was either that or the BD Contact Strap, as that's all I had with me for the summer out west. The BD Sabretooth or similar would be perfect.
5 locking carabiners. The assumption here, and with other discussion about climbing hardware in this piece, is that your partner is also bringing enough to enact a crevasse or other rescue—and/or that you're prepared to haul yourself out as need be. The Petzl Attache has been phased out in its classic HMS shape, but for those looking for a similarly high-performing, light-weight option, the Mammut Bionic HMS provides a smooth substitute.
A) Plaquette/guide-style ATC. Not a necessity—and in fact building a quick munter-on-a-biner is generally more efficient for belaying sections on the North Ridge, but a plaquette is also very useful for crevasse rescue, so I feel the weight is justified.
B) Mini-ascender (Petzl Tibloc). Very useful for efficient rescue techniques, so I feel the weight is justified. C) Knife w/pliers (Leatherman Juice). Both a knife and pliers have numerous applications.
Slings/Cordellettes/Non-locking carabiners. The precise mix of these is up to the individual climber and by the time you're considering the North Ridge you should have a good idea of what you'd like to bring.
A) 7 Ice screws (Black Diamond Express, assorted lengths). This is one area where there may be considerable consternation and debate. It also is an area where your level of comfort ice climbing plays a big role. My math is this: 2 screws per anchor on the technical ice burns a total of 4, leaving 3 for placement en route. You could build v-threads at anchors, but that burns more time. You could place less en route, but you also need to consider your the climbing-comfort level of your second and often the pitches involve some traversing (meaning a big swing for an unprotected second).
B)V-thread tool (Grivel Candela). I bring one 22cm screw with the Grivel Candela v-thread tool. A v-thread tool is useful in the event that a bail or rescue is enacted. I've owned just about every iteration of v-thread tool, from a chinzy DIY coat hanger to the supremely overdone Black Diamond First Shot—the Candela is the hands-down best: It stores inside the screw, has a built-in “knife” (useful but not awesome—bring a real knife as well), and also can be used to ram screws clogged with semi-solid ice. Note: The hook needs to be sharpened after market or you'll have a hell of a time trying to hook your cord.
Harness (Mammut Togir Slide). I'm a fan of a full-on climbing harness, rather than a stripped-down mountaineering one: Easier on and off, handy belay loop, ample gear loops, and comfort justify it, as it translates into greater efficiency. Also, I've got two Petzl Caritools attached for racking screws and holding tools—they work much better than the Black Diamond Ice Clipper, with less shifting around on the harness.
A) GPS (Garmin Venture HC). The GPS market is pretty dynamic these days and a lot of people seem to like the Gaia app. In any case, some kind of GPS device with pre-loaded map/route data solves a ton of trouble on low-visibility days.
B) Map (Green Trails Mt. Baker Version). Yep, may seem old-fashioned, especially with a GPS along, but it is still useful for big-picture map viewing and for tech failures. The Green Trails map is especially good, with many of the common climbing routes marked in their general locations (use your own judgement based on conditions).
Trekking pole (Black Diamond Distance). Trekking poles are helpful for both ascent and descent and can be very useful as a probing tool in cornice and crevasse terrain. This model is pretty darned light weight and compactable, so it's easy to justify bringing along.
Ax w/ adze (Petzl Snowscopic). Since I was using the Fuel Tools for climbing, I didn't have an adze. An adze is useful for t-slot and mid-clip picket anchors. The Snowscopic is my hands-down favorite choice for an ax/adze, since it also doubles (or, I suppose, triples in this case) as a trekking pole. Unfortunately, for reasons unfathomable to me, they have discontinued it. Somebody please buy up the patent a put it into production again—one of the best ideas in mountaineering tools in the last decade.
First-aid kit. I bring a complete kit for storage at basecamp and a smaller one for en route.
Quick-access bag. For things I may want without digging for it, like sunscreen, extra GPS batteries, and lip balm. Note: My headlamp is in there too—and not listed specifically here—don't forget yours. Also a good time to note: My sunglasses weren't in this picture, as I was still wearing them—don't forget yours!
Camp mug. Good for both drinks and food. Don't forget a spork.
Stove (MSR Reactor). A variety of stoves will work, but I've used a baker's dozen and find the MSR Reactor to far-and-away be the freshest slice in that loaf. Supremely fast and efficient, indeed the only problem I've found with the Reactor is that it boils water so quickly you don't even have time to find your dinner fixins'.
Water bag (2L MSR Dromedary). In above-freezing conditions I prefer this over bottles, as it compacts as the day goes along.
Blue bags (Glacier Ranger Station Brand—BYOB toilet paper!). Keep Mt. Baker beautiful for future generations of climbers.
Light upper baselayer (Mammut MTR 71 Base T-shirt). Note: By mid-summer only the coldest souls would need a bottom baselayer.
Light-weight hoody.
Light-weight glove.
Mid-weight glove.
Sun protection hat (Mammut MTR 71 Visor).
Instulated hat (Mammut Stollen Beanie).
2 pair of socks (Darn Tough Mountaineering Over the Calf Extra Cushion). I wear one pair for the hike in and then keep a dry pair for camp and climbing the next day—it's worth the extra space.
Softshell jacket (Mammut Ultimate Hoody). If the forecast hadn't been so good, I might have opted for a hardshell, but bluebird days were called for all week, and softshell like the Ultimate is plenty good if the forecast isn't calling for rain that includes cats and dogs, and a softshell allows greater breathability.
Boxers (Ibex Woolies 150). If you haven't tried wool yet for a boxer, you should. Yes, sounds potentially torturous, but modern wool is smooth as silk. Yes, it's expensive, but the odor-reducing properties of wool make it excellent for longer trips. Granted, the North Ridge isn't such a trip, but I think wool boxers are so great that they are the only boxers I have, even when at home.
Softshell pant. Note: I did not bring a shell bottom on this trip, given the forecasted temps and weather. A shell is a good margin to have for a less-reliable forecast. Make sure they zip all the way up to the waist, so that you can put them on and off during the day even with boots/crampons on. Otherwise, you may put them on in the cold alpine AM and then be burning alive come sun-up.
Tent (Black Diamond First Light). Different people have different opinions about the sea-worthiness of the First Light, but I've enjoyed mine in a wide variety of conditions. One down-side is no vestibule, but for quick trips and good weather, that's not an issue.
Pack (Mammut Trion Guide 50+L). This is the perfect pack for the North Ridge, where you need a pack big enough to carry things to base camp, but then compactable enough and fitting well-enough for technical climbing.
Sleeping pad (Therm-a-Rester Neo Air Xtherm). Of course, any sleeping pad will do, but when thinking about sleep systems, too many people put emphasis on the sleeping bag and forget the rest of the equation. A lot of heat gets lost due to conduction (heat loss to a solid, such as the ground) while sleeping. And even the fluffiest down that insulated your top so well becomes just compressed conduction mush below. The new-school air mattresses like the Therm-a-Rester Neo Air or Mammut Light Pump Mat UL put additional digits into the equation. Insulative power is measured in “r-value” and most air mattresses offer r-values above 4. Old-school air mattresses (like the Therm-a-Rester ProLite) are around a 3 and closed-cell foam like the Thermarester Z-Rest are about a 2 (higher is better). Carry a pad with higher r-value and carry a smaller sleeping bag.
Sleeping bag (Mammut Sphere UL Summer). The Sphere UL is rated to 47F; potentially on the thin side, but when coupled with a high r-value pad (see above) and a down parka “flex layer” (see below) it is just dandy.
Down parka (Mammut Ambler). The Ambler could be a bit of overkill for many in mid-July, but a) I run a bit on the cool side, b) a big toasty parka is great at the wind-exposed belays above 9300', where the technical climbing begins and speed slows, and c) having a fluffy parka means you can bring a lighter sleeping bag.
It's pretty hard to find ice in the Pacific Northwest anytime and it's pretty hard to find ice anywhere in the Northern Hemisphere in the summertime, making a climb of Mount Baker's North Ridge an unparalleled alpine experience. Enjoy yours. Alpine climbing is a craft like any other—it involves learning, experimenting, practicing, making mistakes, reflecting on those mistakes, and pushing the learning forward anew. Throughout the process it demands that we make decsions and take responsibility for the decisions made. I hope that this list helps you in making your own decisions as you move your own alpine climbing ever higher!